Bless you Ken Rockwell
After becoming incredibly disillusioned with my digital SLR camera (a Nikon D70) and it's seeming inability to produce decent results straight out of the camera, I was just about to the point where I was seriously going to put it in mothballs, never to see the light of day again. However, after scouring the web for answers I came across a beaut of a page on good ol' Ken Rockwell's Nikon site where he divulges some pretty nifty Photoshop tips and techniques.
For those of you who are into photography (especially Nikon users) and haven't seen Rockwell's site - where have you been? Do yourself a favour and go straight there: www.kenrockwell.com - just be prepared to spend the next several hours enthralled by his sagely advice on just about everything to do with the subject. Don't say I didn't warn you.
As I was saying, his page dedicated to Photoshop tips and tricks is a must read for long suffering Nikon D70 users like myself that have been struggling to get good colour straight out of the camera. A quick run through the handy digital darkroom techniques contained on this page will guarantee to fire up your enthusiasm for your photos again. Enough talking then, lets look at some of the shots I've doctored up in the ER of Photoshop.
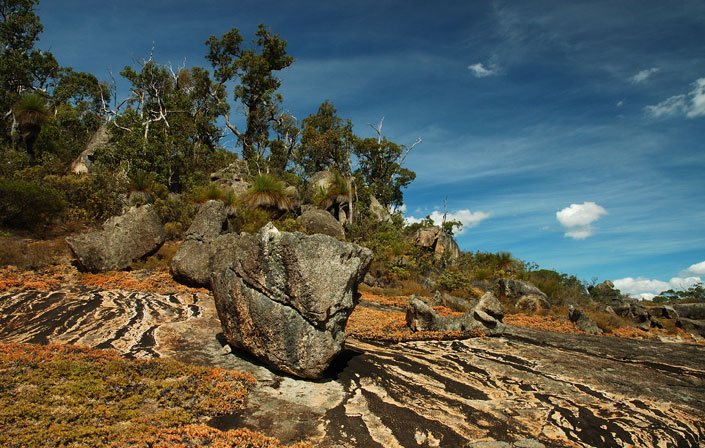
Here's a shot of the western slopes of Mt. Cuthbert in Monadnocks Conservation Park about 70 kilometres south-east of Perth, Western Australia. I was reasonably happy with this shot, but something about it wasn't quite right. The colour and exposure seem "muddy" (for lack of a better adjective). After applying some of the nifty tricks like using Match Color to remove the slight greenish-yellow colour cast, brighten the image and boost colour saturation slightly; adjusting levels in the shadowy areas along the left-hand edge of the image; and using Rockwell's polarizing filter simulation judiciously, I reckon it's a significant improvement.
 Nikon D70 with kit lens (18-70 mm), 1/80 sec @ f/11, ISO 200, handheld.
Original image before post-processing

After post-processing
Here's a shot of a male Ornate Crevice Dragon (Ctenophorus ornatus) on Mt. Randall in Monadnocks Conservation Park. This was the most co-operative wild animal I've ever had the pleasure to photograph in my life. An absolute star of a lizard.
 Nikon D70 with Nikon 60 mm macro lens, 1/160 sec @ f/32, ISO 200, handheld.
Before post

After post
Pretty huge difference! I wouldn't usually bother trying to rescue such a drab, lifeless, and underexposed shot, but in this instance I had to. Why? Because it was easily the best pose that I captured out of about 30 odd shots that I took of this lizard. This just goes to show that it is definitely possible to rescue underexposed images quite easily in post, there's much more detail captured in the darker parts of the image than you'd think. Rescuing detail in overexposed images on the other hand is nigh on impossible so I try to avoid that if I can.
For those of you who are into photography (especially Nikon users) and haven't seen Rockwell's site - where have you been? Do yourself a favour and go straight there: www.kenrockwell.com - just be prepared to spend the next several hours enthralled by his sagely advice on just about everything to do with the subject. Don't say I didn't warn you.
As I was saying, his page dedicated to Photoshop tips and tricks is a must read for long suffering Nikon D70 users like myself that have been struggling to get good colour straight out of the camera. A quick run through the handy digital darkroom techniques contained on this page will guarantee to fire up your enthusiasm for your photos again. Enough talking then, lets look at some of the shots I've doctored up in the ER of Photoshop.
Here's a shot of the western slopes of Mt. Cuthbert in Monadnocks Conservation Park about 70 kilometres south-east of Perth, Western Australia. I was reasonably happy with this shot, but something about it wasn't quite right. The colour and exposure seem "muddy" (for lack of a better adjective). After applying some of the nifty tricks like using Match Color to remove the slight greenish-yellow colour cast, brighten the image and boost colour saturation slightly; adjusting levels in the shadowy areas along the left-hand edge of the image; and using Rockwell's polarizing filter simulation judiciously, I reckon it's a significant improvement.
 Nikon D70 with kit lens (18-70 mm), 1/80 sec @ f/11, ISO 200, handheld.
Original image before post-processing

After post-processing
Here's a shot of a male Ornate Crevice Dragon (Ctenophorus ornatus) on Mt. Randall in Monadnocks Conservation Park. This was the most co-operative wild animal I've ever had the pleasure to photograph in my life. An absolute star of a lizard.
 Nikon D70 with Nikon 60 mm macro lens, 1/160 sec @ f/32, ISO 200, handheld.
Before post

After post
Pretty huge difference! I wouldn't usually bother trying to rescue such a drab, lifeless, and underexposed shot, but in this instance I had to. Why? Because it was easily the best pose that I captured out of about 30 odd shots that I took of this lizard. This just goes to show that it is definitely possible to rescue underexposed images quite easily in post, there's much more detail captured in the darker parts of the image than you'd think. Rescuing detail in overexposed images on the other hand is nigh on impossible so I try to avoid that if I can.
posted by leucopogon at 11:52 pm
5 comments
![]()
